
FROM PRODUCT TO MEDIA...
Technical integration guide
This guide covers all the steps to communicate with your consumers through an interactive experience. Thanks to XPR (Product Communicator) and MKN (Marketing Innovator) roles.
OVERVIEW
🔧 Remember to enable your local network settings when arriving at the website in Chrome :
LIVE EXAMPLE :
https://demo.solution-server.com/leaders2025/xH/Bryo/
N°1 - Custom BUTTONS to go to the main scene, reset the experience and see a 360° animation.
N°2 - Custom TABS to slide between colored scenes and display settings.
N°3 - Custom COLORS in the colors tab, that go to a specific scene for each.
N°4 - Custom INFORMATION to see that the Experience Media is playing, the background, and the quality settings.
Technology stack
Tool | Role |
xHighlight | 3D experience authoring scenes, animations, hotspots, variants... |
xMedia | Cloud-based Media Asset Management and experience deployment platform |
FTP Client + Code | File transfer to the web server (FileZilla) and website shell + custom interactive control interface |
ExperiencePlayer Web Component | Embeds and controls the xHighlight Experience Media in the browser via WebGL |
Pipeline overview
xHighlight Author | → | xMedia Deploy | → | Web Server Client | → | Browser Experience |
SUMMARY
Step 1 : Using xHighlight
Step 2 : Using xMedia
Step 3 : Web Server Deployment via FTP
Step 4 : Embedding & customizing the Browser Experience
Step 1 - Using xHighlight
Build your experience
Import your 3D model or Open your product into xHighlight.
Set up scenes: define camera positions, part visibility, and environment for each state.
Create animations: use the timeline editor to easily set animations and transitions.
Add interactive hotspots or annotation overlays if the experience includes guided exploration.
Configure highlight or material variants for product personalization features.
Test all scenes and animations in xHighlight's built-in preview mode at any time.
Measuring scene duration
To determine the exact duration of a scene animation (required for the web timer-based pause):
Open the scene in xHighlight.
In the bottom panel, open the Timeline.
The total duration is shown at the end of the timeline bar and can be modified with this icon:
Note this value it will be used as SCENE_ANIMATION_DURATION in the website JavaScript.
🗒️ Note: always record the duration in milliseconds. The web integration uses a timer set (duration – 0ms to 500ms) to pause just before the natural scene end.
Publishing from xHighlight to xMedia
- In xHighlight : → Publish button
In the publish dialog, select Destinations and then “3DSpace” → [Your Presentation Collaborative Space].
This determines where the published experience appears inside xMedia “Places” for management and deployment. It will reuse the Collaborative Space your team uses for this project.
Step 2 - Using xMedia
Finding your published experience
- In the left panel in xMedia, click "Places".
- Under 3DSpace, select this project Collaborative Space ; your experience must appears in the Work Area.
Deploying the experience
🗒️ Note 1 : you must have the rights to manage deployments to do this step. Contact your Admin to grand you access
🗒️ Note 2 : you must have your server registered within xMedia authorized list. Contact your Admin to authorize it
- Select your experience, and click "Preview".
Select your experience, and click "Deploy Content" :
- Click on "Web Deployments" and wait for the confirmation notification. The deployment now appears in the Left Panel under Deployments → Website Integrations.
Getting the embed credentials
- In the Deployments panel, select your deployment and click "Integration Documentation" from the flyout menu. You are directed to the Experience Player Documentation page.
You can choose between Static Instantiation (using HTML Tags) or Dynamic Instantiation (using Javascript). Click "Generate full HTML". This downloads a file called "index.html" to automatically fill your experience in your code.
🗒️ Note : every republish from xHighlight to xMedia generates a new model path. Always retrieve fresh credentials after each republish and update the model attribute in your HTML.
How to interact with the player (getting your scenes ID and functions)
The inspector provides useful commands to communicate with your player and experience.
In the Deployments panel, click on your deployment and click "Preview". Once the Media Experience is loaded, click on "Information" at the right-top and click on the "INSPECTOR" tab.
- In the Inspector, you can copy functions from sections “Tools”, “Visu” and “APIs” where all scenes are listed, using the icon at the right of each scene/toolbox/button.
For example:
- For the GUI Visibility, you will have in your clipboard "playerWebComponent.xHvisibilityImmersiveGUI(false);" (Tools)
- For a transparent background, you will have in your clipboard "playerWebComponent.setTransparentBg(undefined);" (Visu)
- For a scene, you will have in your clipboard "playerWebComponent.xHplayScene("YOUR SCENE ID");" (APIs)
Step 3 - Web Server Deployment via FTP
🗒️ Note : the website HTML file and local assets (images, icons, SVG files) are uploaded to the web server using an FTP client. The .dsxm file is not uploaded via FTP, it remains hosted on xMedia cloud infrastructure and is referenced by URL in the embed code.
Web integration steps
Open your FTP client, navigate to your website root directory and upload the file "index.html" you previously downloaded.
- Open the website URL in a browser to verify deployment. (You must only see the experience for the moment)
Add CSS and functions to personalize your website.
Step 4 - Embedding & customizing the Browser Experience
🗒️ Note : the ExperiencePlayer Web Component exposes a full JavaScript API. Always wait for the ExperienceReady event before calling any API method.
ℹ️ You can see the full documentation available for APIs listed with links below :
PARAMETERS
COMMUNICATION
API DESCRIPTION
💡 RECOMMENDATIONS & CODE IDEAS💡
PROGRESS IMAGE LOADING/ SPLASHSCREEN PARAMETERS 📽️
This configuration controls the animated loading image. If you only provide the main progress image, the player automatically generates a gray version of it to serve as the background silhouette, which fills up as the loading progresses. The background color of the loading area is set by default to white (rgb(255, 255, 255)) and can be modified. (Formats : JPG, PNG, WEBP or GIF)
OR :
const player = document.getElementById("ExperiencePlayer");
if (player) {
   player.setAttribute("progressLoadingImage", "image.png");
   player.setAttribute("progressLoadingBackground", "true");
   player.setAttribute("progressLoadingBackgroundColor", "rgb(255, 255, 255)");}
This configuration controls the static splash screen image. By setting waitloading="true", your custom background image (splashscreenImage) will stay visible and locked in place over the player area until the 3D data completes its loading process.
   id="ExperiencePlayer"
   applicationId="10"
   distributionId="R1132102076603"
   model="............dsxm"
   waitloading="true"
   splashscreenImage="background-image.jpg">
OR :
const player = document.getElementById("ExperiencePlayer");
if (player) {
   player.setAttribute("waitloading", "true");
   player.setAttribute("splashscreenImage", "background-image.jpg");
}
EVENT LISTENER 👂
Listens for messages posted by the Experience Player iframe using the "ExperienceCommunication" protocol from host. This is a way to know what state the player is in, since the player runs in an isolated iframe context.
window.addEventListener("message", function(e) {
       if (!e?.data || e.data.protocol !== "ExperienceCommunication") return;
       const action = e.data.action;
       if (action === "ExperienceReady") {
           updatePlayStatus(true);
           P()?.xHgetScenes().then(scenes => { globalScenes = scenes; });
       }
       if (action === "onPlay")  updatePlayStatus(true);
       if (action === "onPause" || action === "onEnd") updatePlayStatus(false);
   });
TIMER MANAGEMENT ⏲️
A clearTimers() function cancels any active pause timer before starting a new operation, preventing conflicts if the user navigates away mid-animation:
function clearTimers() {
 if (pauseTimer) {
   clearTimeout(pauseTimer);
   pauseTimer = null;
 }
}
FUNCTION GO TO SCENE BY SCENE NAME 📽️
The navigation handler for color swatches, scene shortcuts, and feature card clicks. Navigates to a scene then immediately pauses it for interactive exploration:
function goSceneByName(name, swatchEl) {
       clearTimers();
       const scene = globalScenes.find(s => s.name === name);
       if (!scene) return;
       P()?.xHplayScene(scene.id).then(() => P()?.xHpause());
       if (swatchEl) {
           document.querySelectorAll(".swatch").forEach(s => s.classList.remove("active"));
           swatchEl.classList.add("active");
       }
       currentSceneId = scene.id;
      }
Example for color swatches :
Red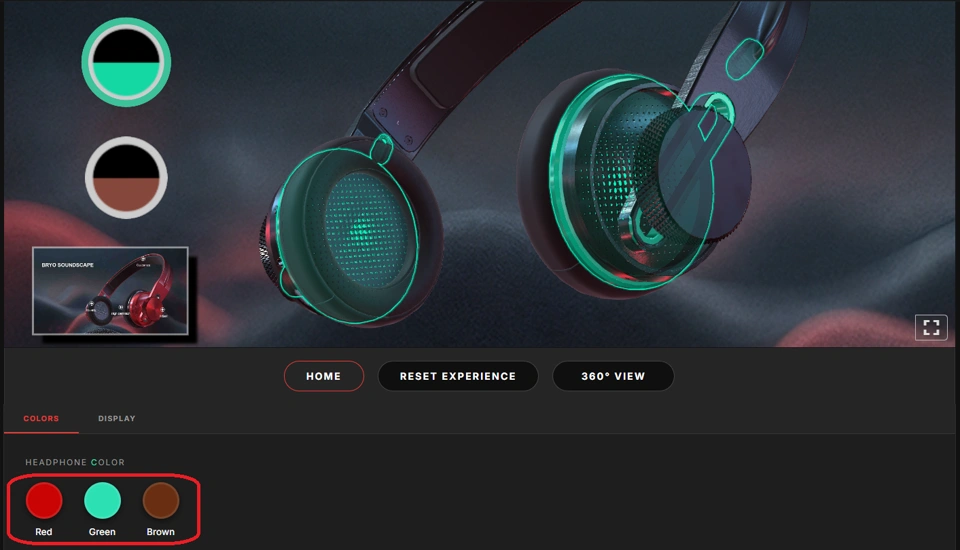
STANDARD SCENE NAVIGATION 🧭
"Home" scene button 🏠
Navigates to the master menu scene using the name for example 'Home' as defined in xHighlight. Falls back to the first scene if 'Home' is not found :
function goHome() {
clearTimers();
const scene = globalScenes.find(s => s.name === 'Home') || globalScenes[0];
if (!scene) return;
P()?.xHplayScene(scene.id).then(() => P()?.xHpause());
document.querySelectorAll('.swatch').forEach(b => b.classList.remove('active'));
currentSceneId = scene.id;
setAnimVisible(false);
}

Feature cards on click navigation 🖱️
Feature cards trigger direct 3D scene navigation. Clicking a card scrolls the user to the player and loads the relevant scene:
Feature Title
Feature description text.
Explore in 3D →

Color swatch navigation 🎨
Color swatches navigate to a dedicated scene per variant. Passing this as the second argument to goScene() lets the function highlight the active swatch:
DISPLAY TOGGLE PATTERN 🧰
Here you can use the function given from the xMedia inspector (Tools / Visu) and implement it the way you want.
Another way is to set functions like this to enable/disable functions via buttons or something else:
function toggleGUI() {
isGUIVisible = !isGUIVisible;
P()?.xHvisibilityImmersiveGUI(isGUIVisible);
document.getElementById('tog-gui').classList.toggle('on', isGUIVisible);
}

ANIMATED PLAYBACK FOR A 360° PATTERN (with timer-based pause) 🕧
Variable declaration :
Duration (in milliseconds) of the animation, as measured in xHighlight's timeline panel. The auto-pause fires at exactly this time, just before xHighlight would automatically advance to the next scene. The timer intercepts it (workaround⏳ until there is a specific API). SCENE_360_DURATION must be measured manually in xHighlight's timeline and updated after every animation modification.
const SCENE_360_DURATION = *****;
function play360() {
const p = P();
if (!p) return;
const scene = globalScenes.find(s => s.name === "YOUR_SCENE_NAME");
if (!scene) return; // Safety guard
clearTimers();
document.querySelectorAll(".swatch").forEach(s => s.classList.remove("active"));
// Skip re-navigation if already on the 360 scene to avoid the xHplayScene. re-trigger glitch; navigate only when coming from a different scene
const playAnimation = () => {
p.xHplay(); // Start the animation
// Schedule the auto-pause to fire just before the natural end
pauseTimer = setTimeout(() => {
p.xHpause();
pauseTimer = null;
setScene360Visible(false); // Restore "360° View" button for replay
}, SCENE_360_DURATION);
};
if (currentSceneId === scene.id) {
playAnimation();
} else {
p.xHplayScene(scene.id).then(playAnimation);
}
}

________________________________________________________________________________________________________
If you have any question or issue, feel free to ask or check the demo website to see if you can find help there.
ℹ️ After reading this guide, if you want to find out more about the code and use it for your own experience we recommend inspecting the page of the website, there is plenty comments explaining all the functions and declarations. (CTRL + U or Right-click > Inspect > ‘Elements’ tab)
You can even use it to be inspired for your CSS and the implementation of your Media Experience.
